This design can be a bit tricky but is also
very versatile in the size it can be. This instructional is
for a medium sized pond - and hopefully, one you'll be able
to contract and expand given your space needs. |
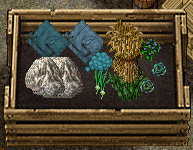
Items Needed:
- 28 Regular Colored Granite
- 1 Cotton dyed dark blue
- 36 Dark Blue Cloth
- 5 Light Blue Cloth
- 6 Wheat Sheif
- 1 Water Plant
- 2 Onions
- 2 Cabbage
- 4 Nightshade
|
|
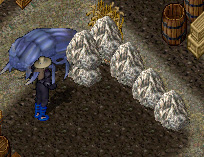
Start out by placing 4 of the granite on the north side
of where you will be placing your pond.
Stack 2 more granite on top of your west corner stone and
1 more granite on the stone just east of it. This will add
some depth to your design.
Place the 2 wheat sheifs (as a single pile) onto the west
corner stone and lower them 2 or 3 placements (depends on
how much grass you wish to have poking out). |
|
You have now placed your back wall to the pond.
Next is to place 2 stacked granite south of your west corner
stone. You are starting to built foward, makng the sides to
your pond. Raise the top granite 2placements. |
|
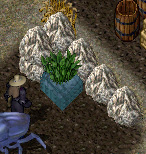
Next to (east of) the 2 stones you just placed, place 2
dark blue cloth. On that, stack 2 more dark blue cloth piles
(3 piles total stacked).
On that same pile, stack 1 cloth of the light blue (not 2)!
On top of that, stack a plain water plant and raise it 5
placements. |
|
| Next to (to the east) of the water tile you just
built, you will repeat the stacking of 3 piles of dark blue
cloth, and a single light blue cloth. On top of this pile, place
the single dark blue cotton and raise it 2 placements. Place
a single stone at the end of this row of tiles. Raise it 2 times. |
Again, at the western most of your design, place stack
of 2 granite, and raise the top granite 1 time.
Next to it, repeat the 3 piles of dark blue cloth stacked
(piles consist of 2 cloths each). This time, add a 4th pile
of dark blue to the stack then top with a light blue cloth.
Place a cabbage on top of this pile and raise it until it
is appearing to be growing from the granite. I do not give
exact raising and lowering as there are different tile placements
for cabbage.
Place 2 Onions (as a pile) and raise them up so they appear
to be behind your cabbage.
Next to this water tile you just built, repeat the water
(4 piles of dark blue cloth topped with a single light blue)
and end the row off with a stack of 4 granite and 2 nightshade. |
|
You are getting to the point of needing to close off your
design.
Start again on the west side, next row down. Place a stack
of 2 granite. Raise the top one 2 times.
Repeat your cloth stacking (4 piles of dark blue cloth topped
with a light blue cloth). Place your 2nd head of cabbage on
top of this pile.
Instead of adding a 2nd tile for water, you will want to
use stacked granite. Stack 4 pieces of granite. Next to that,
in the 4th tile in your row, place 2 wheat shiefs. Stack a
piece of granite on top of them and lower it 7 times.
Stack another piece of granite on the wheat and lower it
5 times. |
|
Time to finish off your pond!
On the western most tile, place 1 granite.
Next to it, place your remaining 2 wheat shiefs. Raise them
2 times. Stack a piece of granite on that tile. It should
go to the bottom of the wheat. Place another piece of granite,
and again, this should go below the wheat. Raise this one
1 placement.
On the next tile to the east, place 1 piece of granite and
raise it 4 times.
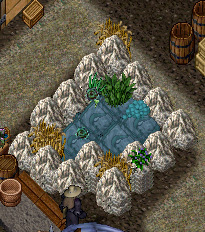
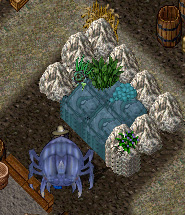
Your pond... is... COMPLETE! |
|
Given the right surrounding deco (obviously
not a floor designed for storage and crafting as is my roof),
this piece of decor is really a lovely asset. Remember, you
can use whatever you like to decorate the top of your water.
What I used were merely suggestions.
Also note, by increasing the tiles used and changing the
external shape, this basic design can truly turn into a huge
work of art.
Happy Decorating! |